
<< Back to Enterprise Web User's Guide
Adding / Editing an Event
This document describes adding and editing events.
Creating a New Event
1.) Log into Enterprise Web
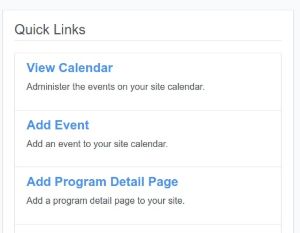
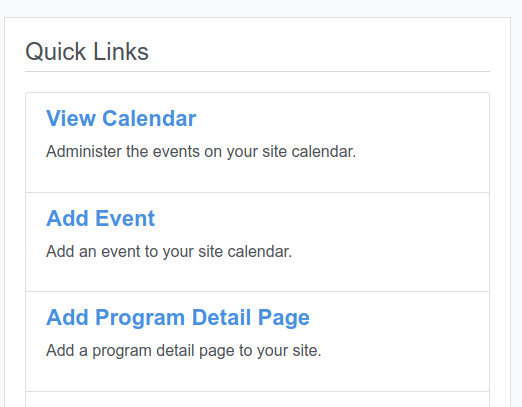
2.) Select Add Event in Quick Links. Alternatively, go to Calendar & Events in the Dashboard and select Add Event.
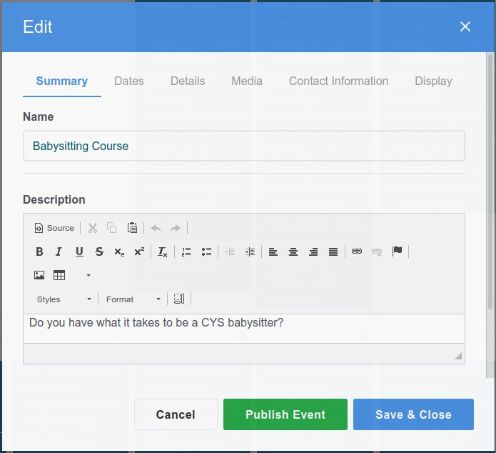
3.) Summary tab:
Here are the different fields you have available and what they will populate in this tab:
- Name: This is the name of the event.
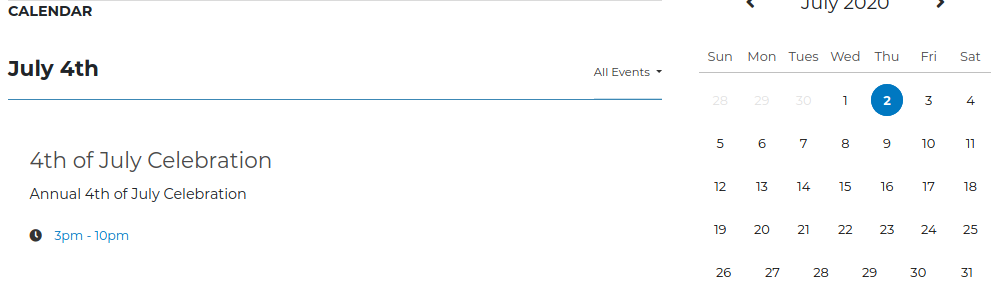
- Description: This is a description for the event that will be used when displaying a brief view of the event such as in the calendar (/calendar). It is also shown under the event name on the event’s page. Add a short, inviting, descriptive phrase.

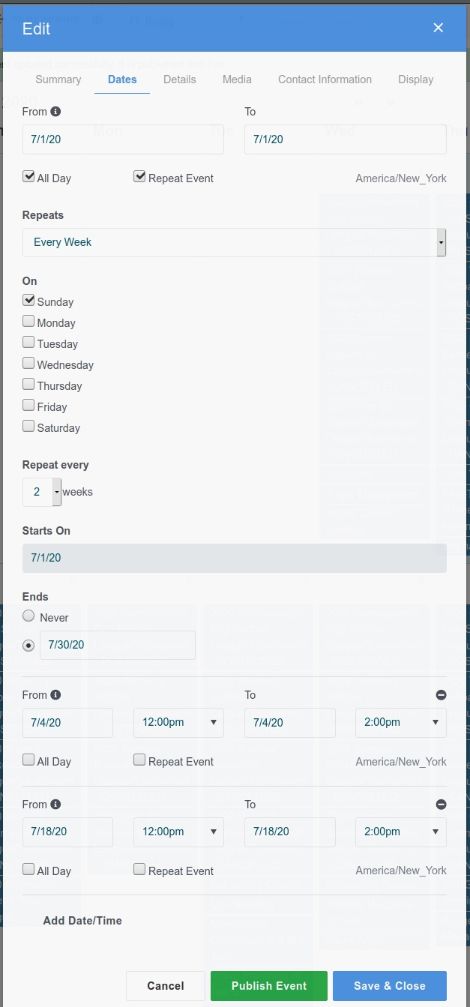
4.) Dates tab: Here are the different fields you have available and what they will populate in this tab:
- From: The start date and time of the event. A date picker will appear when you select this field.
- To: The end date and time of the event.
- Note: If an event spans multiple days, it should be set up as a repeating event that repeats daily. If a multi-day event is set up as a single, non-repeating event, only the first day of the event will show in the agenda view.
- All Day: If the event does not have start and end times, select All Day to hide them.
- Repeat Event: If the event regularly repeats, select this option to reveal further options:
- Repeats: Select the repetition frequency.
- On: If the event repeats weekly, select the day(s) on which the event.
- Repeat By: If the event repeats monthly, select the repetition pattern.
- Repeat every: Select the repetition interval.
- Starts On: (not editable) This is set to the event From Date.
- Ends: Select the date on which the event begins repeating.
- Repeats: Select the repetition frequency.
- Add Date/Time: To add other dates, date ranges, or repeating dates, select this option to insert another row of the above options.
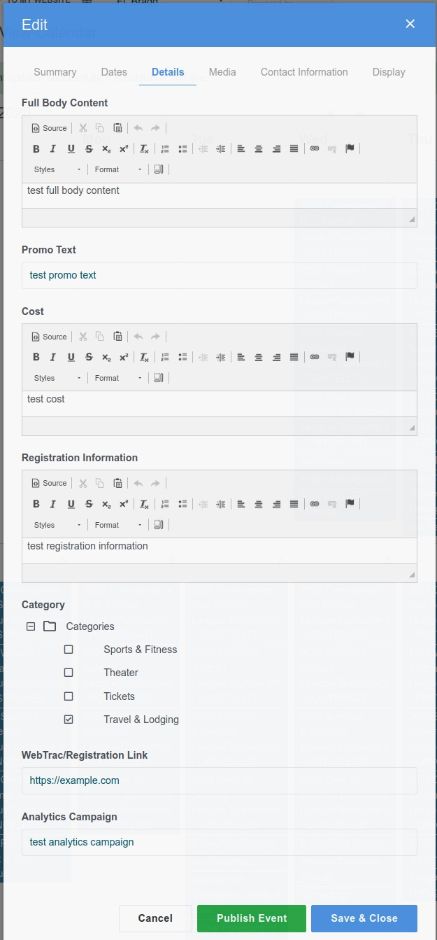
5.) Details tab: Here are the different fields you have available and what they will populate in this tab:
- Full Body Content: This is the main content for your event. This is a rich text editor, so you can insert images and make links in your content and style text with bold and italic, among many other options.
- Promo Text: This is text that will appear over the top of the image on the event.
- Cost: This is information that will appear on the event page under the “Cost” heading - useful for ticket prices, etc.
- Registration Information: This is information that will appear under the heading “Registration Information” on the event page.
- Category: This is the category that the event belongs to. This will make it appear in that category’s filter on the calendar, available to pin on Boards, appear on category pages that match its category, and also just help to keep things organized in general.
- WebTrac/Registration Link: This is a link that will make a button on the event page for linking to a checkout page for WebTrac, for instance.
- Analytics Campaign: If set, adds a dimension to Google Analytics.
6.) Media tab: Here are the different fields you have available and what they will populate in this tab
- YouTube Video ID: YouTube videos can be used in place of images. Add only the ID in the YouTube field, not the full URL.
-
Replace Image with Video: Select this option to display the YouTube video in place of the image.
-
Image: choose an image that represents the event. Click Choose File to go to the File Manager to select an existing image or upload a new one. This is for images only, not for downloadable PDFs or documents.
To swap out an existing image, click Clear. -
Horizon Image: choose an image that will be used as a full-width background for some templates.
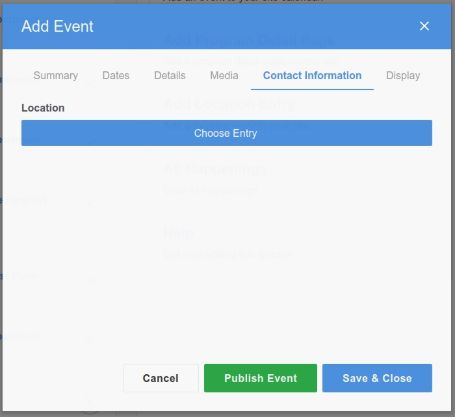
7.) Contact Information tab: Here are the different fields you have available and what they will populate in this tab:
- Location: Select the location entry where the event will occur. The location information will be displayed with the event as well as locate it on the map.
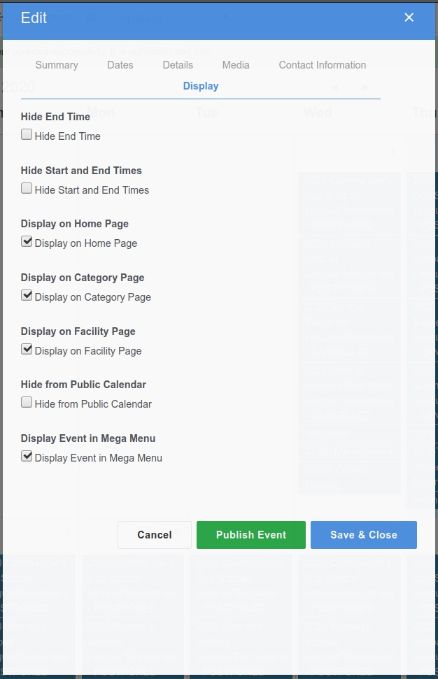
8.) Display tab: Here are the different fields you have available to customize how the event will be displayed.
- Hide End Time: Displays only the day and start time of the event.
- Hide Start and End Times: Displays just the date.
- Display on Home Page: If selected, the event will be in the pool of events shown on the home page.
- Display on Category Page: If selected, the event will be in the pool of events shown on the category pages to which the event belongs.
- Display on Facility Page: If selected, the event will be in the pool of events shown on the location page to which the event is associated.
- Hide from Public Calendar: If selected, the event will not be shown in the public calendar. This option is especially useful for programs like ACS that have so many classes that they can dominate the calendar. Events and classes can still appear on category and facility pages.
- Display Event in Mega Menu: If selected, the event will be in the pool of events shown in the Mega Menu.
Once the form is completed, select either Publish Event to make the event live immediately or Save & Close to keep the event as a draft for editing later.
Approval Process
When Authors select Save or Publish, a notification will be sent to the Approver’s welcome screen. The event will also appear on the Edit mode calendar as a lighter shade. The Approver may then review/deny/approve and publish the event. When Approvers select Publish Event, the event is immediately published.
Colors and icons in the Calendar & Events view indicate the approval and publish status of the event.
Pending (not-live, unapproved) events appear in a lighter shade of their category color, with an exclamation mark.
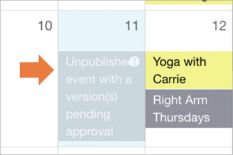
Approved (live) events appear in solid color on the calendar.
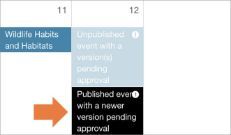
Events that are published, but have a new version that is unpublished will be the solid color with an exclamation mark.
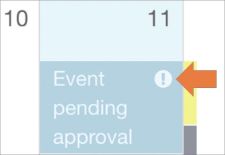
The exclamation mark indicates that an event has content which is in a pending, unpublished state.
Editing an Event
Authors and Approvers can edit Published Events. When an Author edits a published Event and selects either Save & Close or Publish, the changes to the event will be saved in an unpublished state. A notice will appear in the Approver’s Waiting for Me panel. The Approver can then view/deny/approve the changes to the event.
Existing events can be found in through the back end by either:
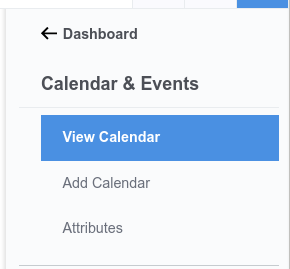
1.) Selecting the View Calendar quick link on the Welcome page
2.) Going to the Dashboard panel and select Calendar & Events.
Once an event has been located, select the event to display a contextual menu with the following options:
- Visit Page: Visit the page for the event selected.
- Details: A quick summary of the event details.
- Edit: Open the edit event modal window. This will bring up the same modal window as when the event was created.
- Summary Templates: Summary templates used inside containers and inside board slots. An event may be limited to specific templates if needed.
- Duplicate: Create an unpublished copy of this event.
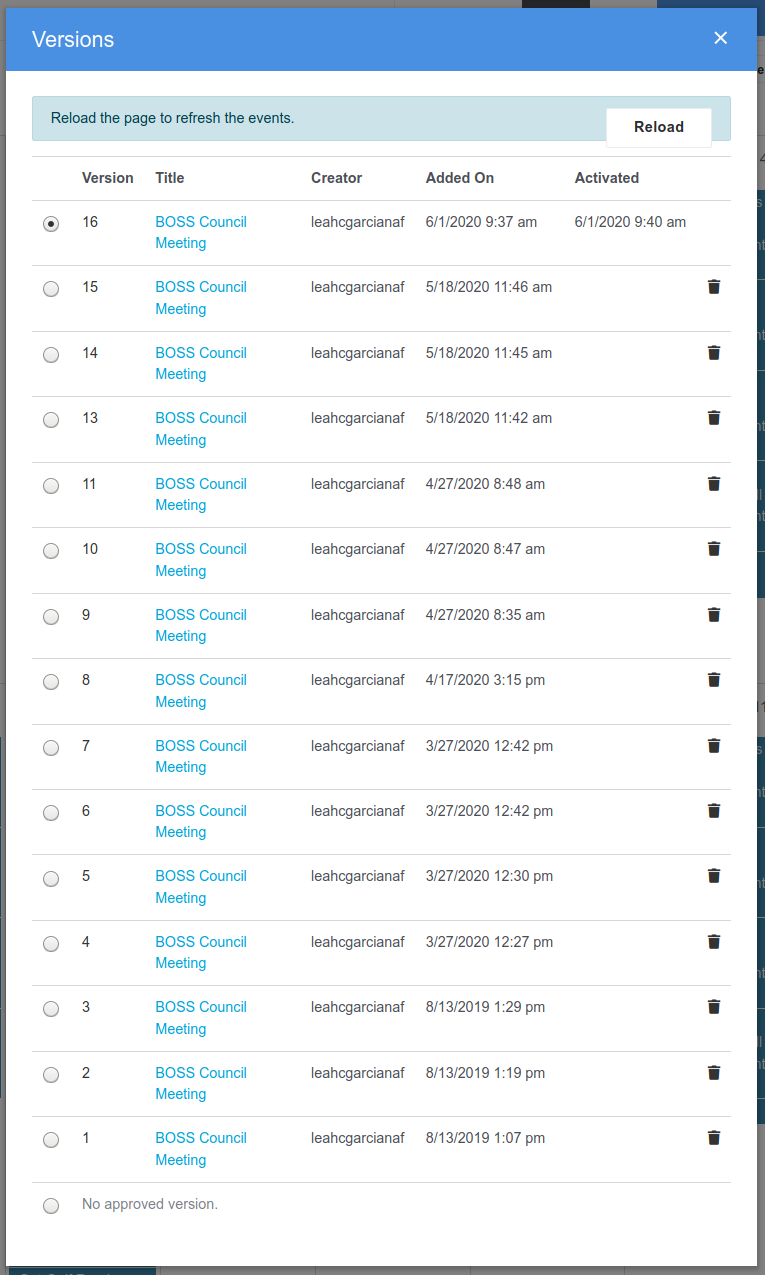
- Versions: Click this to view the history of the event and re-publish previous versions.
- Delete Occurrence: (Only appears on recurring events.) Deletes this date’s event only.
-
Delete Event: Deletes the entire event and all occurrences.

Editing an Event from the front end
Events can also be found through the front end by either:
1.) Using the search function

2.) Finding the event in the calendar
When events are found through the front end, the only option to edit the event is to select the Edit Event button. This will bring up the same modal window as when the event was created.
Results
Creating events for your site will help you promote important things that occur on your installation as well as allow you to liven up Boards on your site with engaging, curated content.
Troubleshooting
If you have any questions or run into any issues, reach out to the support team by selecting the question mark icon in the upper right in the edit bar on Enterprise Web.
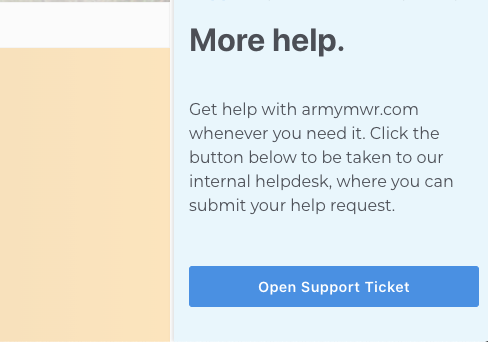
Scroll to the bottom of the blue side menu, past the reference materials links, and select Open Support Ticket button to open a ticket. Someone will get back with you shortly.

2026 Third Quarter Analytics
Discover key insights into FY26 Q3 website traffic trends for ARMY MWR programs, including user engagement, traffic sources, and top-performing installations. Explore analytics highlighting organic search dominance, referral traffic, and...

2026 Second Quarter Analytics
Army MWR delivered strong growth across all traffic metrics during Q2 FY26. Total users grew 19.4% year over year to 7,285,317, and new users rose 18.9% to 6,998,139, indicating the enterprise is successfully expanding its reach to first-time...

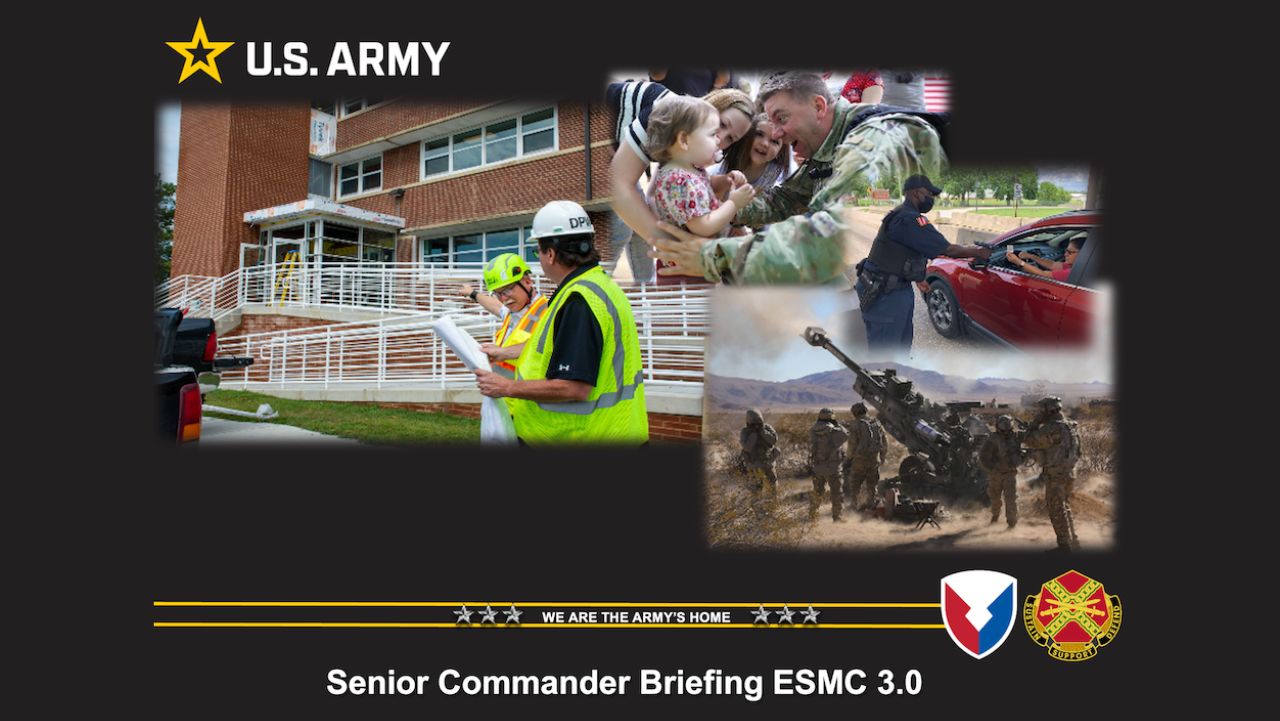
ESMC 3.0 Senior Commander Brief
ESMC 3.0 Senior Commander Brief Summary ESMC 3.0 represents a structural modernization of Army MWR’s digital ecosystem, shifting from...
Better Opportunities for Single Soldiers (BOSS) 2025
BOSS 2025 The Better Opportunities for Single Soldiers program sustained steady digital engagement throughout the reporting period, reflecting...

DHL 6 Days 5 Night Package
DHL 6 Days 5 Night Package The DHL 6 Days 5 Night Package page is performing as a high-intent booking asset, generating 2,311 users with a 90%...

2026 First Quarter Analytics
In the first quarter of FY26, ARMY MWR websites demonstrated steady growth in user engagement and visits. Total users and page views increased,...

Transitions Report
Learn how to use Matomo’s Transitions report to understand how users arrive at a page, what they click next, and how to identify internal...

2025 Fourth Quarter Analytics
ARMY MWR digital engagement strengthened in Q4 FY25, with 2,363,810 total users (up 8.6% year-over-year). Pageviews rose to 6,152,314 (+5.9%), and...

Continuity Book
These resources will allow you to take the products provided below and make them fit to your Garrison. There are many different documents and...